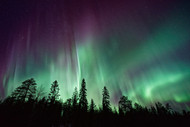
Viewing the Northern Lights is a universal bucket list item. According to National Geographic, the Fairbanks region is the number one viewing spot in the United States because it sits right under the Auroral Oval - a ring-shaped region hovering over the northern hemisphere that allows views to see 80 percent of the aurora activity.

Olympus OM-D E-M1 II | 7-14mm f/2.8
After reading this and glancing over some amazing National Geographic photos I decided it was time to bite the bullet and book a plane ticket for Alaska. I knew my iPhone would not be enough to capture the Aurora Borealis in all its glory, so I headed to Precision Camera to rent a camera for the week. Staff members suggested I rent an Olympus E-M1 MK II with a 7-14mm f/2.8 wide lens perfect for shooting wide night images.
After arriving to Fairbanks, I went out with a local photography experts who helped me capture some fantastic images of the Northern Lights. Here is what we taught me.

Olympus OM-D E-M1 II | 7-14mm f/2.8
Tips for photographing the Aurora
- Manually set your camera to the highest ISO, widest focal point, and lowest aperture. Take a few photos to experiment and adjust as needed.
- Using a tripod is a must. Do not forget it. Long exposure times are necessary because you are shooting in the dark. Without a tripod, your pictures will be blurry.
- Start off with exposing each shot for four seconds. You might need to increase the exposure time if the aurora lights are dim. Anytime more than ten seconds will result in streaking starts and soft auroras. Shorter exposures will have sharper details, but dimmer images.
- Wide angle is the lens of choice for capturing the aurora.
- Set your focus to infinity.
- Locate a dark area with minimal light pollution. The farther away from a city center, the better.
- Consider having a foreground point of interest like trees or a building to help balance the shot.
- The temperatures can plummet to well below zero degrees killing battery life. Make sure you bring extra batteries. If you do not have a nearby warm building to store equipment while you wait, keep charged batteries in pocket with hand warmers so they say warm.
- Wrap your camera in a wool scarf to keep the body warm while you take photos.
- Seeing the Northern Lights is a waiting game and you are not guaranteed to see them. If you have a warm building to wait in do so, but do not take your camera out into the elements until you are ready to take your photos. It is best to leave the camera in a warm environment as long as possible to prevent battery drainage and frost on the lens.
- Put your lens cap on before bringing the camera inside, or you’ll have condensation all over the lens.
- Have patience. Seeing the Northern Lights is like fishing. You never know when and where they will show up or what you will get if they do show up.
Blog contributed by Jennifer Simonson | @storiestoldwell | https://www.storiestoldwell.com/news/

